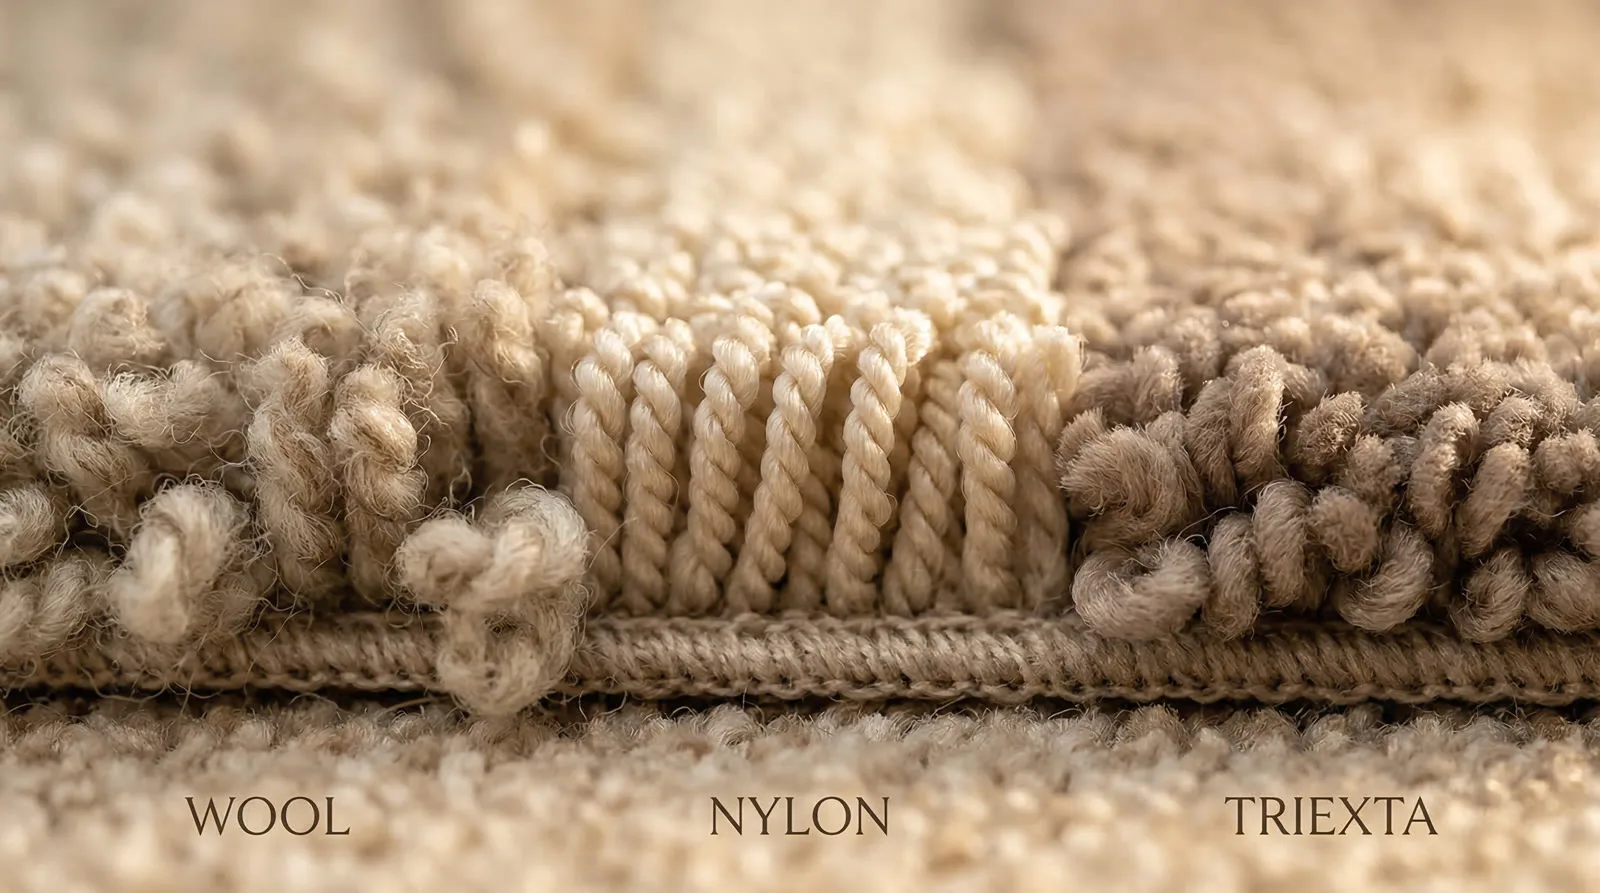
| Installation Method | Tolerance Requirement |
|---|---|
| Floating floor (hybrid, laminate, floating engineered) | 3mm deviation over any 3-metre span |
| Direct-stick (adhesive-set engineered, vinyl) | 2mm deviation over any 3-metre span |
| Ceramic or stone tile | 3mm deviation over any 3-metre span (grout joint dependent) |
| Carpet (direct stick or stretch-in) | 5mm over 3 metres |
By The Flooring Centre Technical Team
Of the variables that determine whether a flooring installation succeeds or fails, subfloor preparation is the most consequential and the most frequently underestimated. It is the stage that happens before the floor is visible, which means its quality — or lack of it — is invisible at handover and only becomes apparent months or years later, when the problems it creates have had time to manifest.
Flooring failures attributed to product quality are, in the majority of investigated cases, actually failures of subfloor preparation and installation practices. Cupping timber boards, hollow-sounding hybrid floors, delaminating adhesive bonds, persistent squeaking under carpet — these are diagnostic presentations, and in most instances the correct diagnosis points not to the floor itself but to the substrate it was laid over.
This article provides a rigorous technical examination of subfloor preparation across the major subfloor types encountered in Melbourne residential and commercial construction, with the testing protocols, tolerance requirements, and installation conditions that govern a durable outcome.
Quick answer
Subfloor preparation is the single most consequential step in any flooring installation — more important than the flooring product itself. The four non-negotiable checks are: moisture content (concrete slabs must read below 4.5% on a hygrometer; timber subfloors below 12% MC), flatness (3mm tolerance over a 3-metre straight edge for floating floors; 2mm for glued installation), structural integrity (no soft spots, loose boards, or movement), and cleanliness (no dust, no adhesive residue, no paint).
Skipping subfloor prep is the single biggest cause of premature floor failure in Melbourne homes — concrete slabs that weren't moisture-tested fail floating floors within 18 months; timber subfloors that weren't levelled produce squeaks and joint stress for the life of the floor. Self-levelling compound, damp-proof membranes, and acclimatisation timing all matter. Full installation-spec guidance for concrete and timber subfloors follows.
Why Subfloor Preparation Is the Critical Step
A flooring system is a mechanical assembly. Every component interacts with every other component: the subfloor provides the structural foundation, the floor covering responds to it, and the building environment acts on the entire assembly. The preparation of the subfloor determines the conditions under which every subsequent interaction takes place.
Dimensional tolerance: Floor coverings — particularly floating systems — operate within defined tolerance parameters for flatness and levelness. Exceedances of these tolerances create localised stress concentrations at click-lock joint profiles, rocking boards that accelerate joint wear, and acoustic problems (hollow spots, drumming). These conditions worsen progressively rather than stabilising.
Moisture: Water is the primary vector of flooring failure. Moisture in a subfloor migrates upward through vapour pressure differential and interacts with every organic or adhesive element of the floor assembly above it. Dimensional movement in timber, adhesive bond failure, backing delamination, mould growth — all are moisture-mediated failure modes that preparation protocols are specifically designed to prevent.
Surface soundness: An adhesive or mechanical bond is only as strong as the substrate it is bonded to. A soft, dusty, or contaminated concrete surface fails before the adhesive; a deflecting timber subfloor transfers load in ways the floor above cannot accommodate. Surface soundness is not an aesthetic requirement — it is a structural prerequisite.
Melbourne’s Subfloor Landscape: Three Primary Types
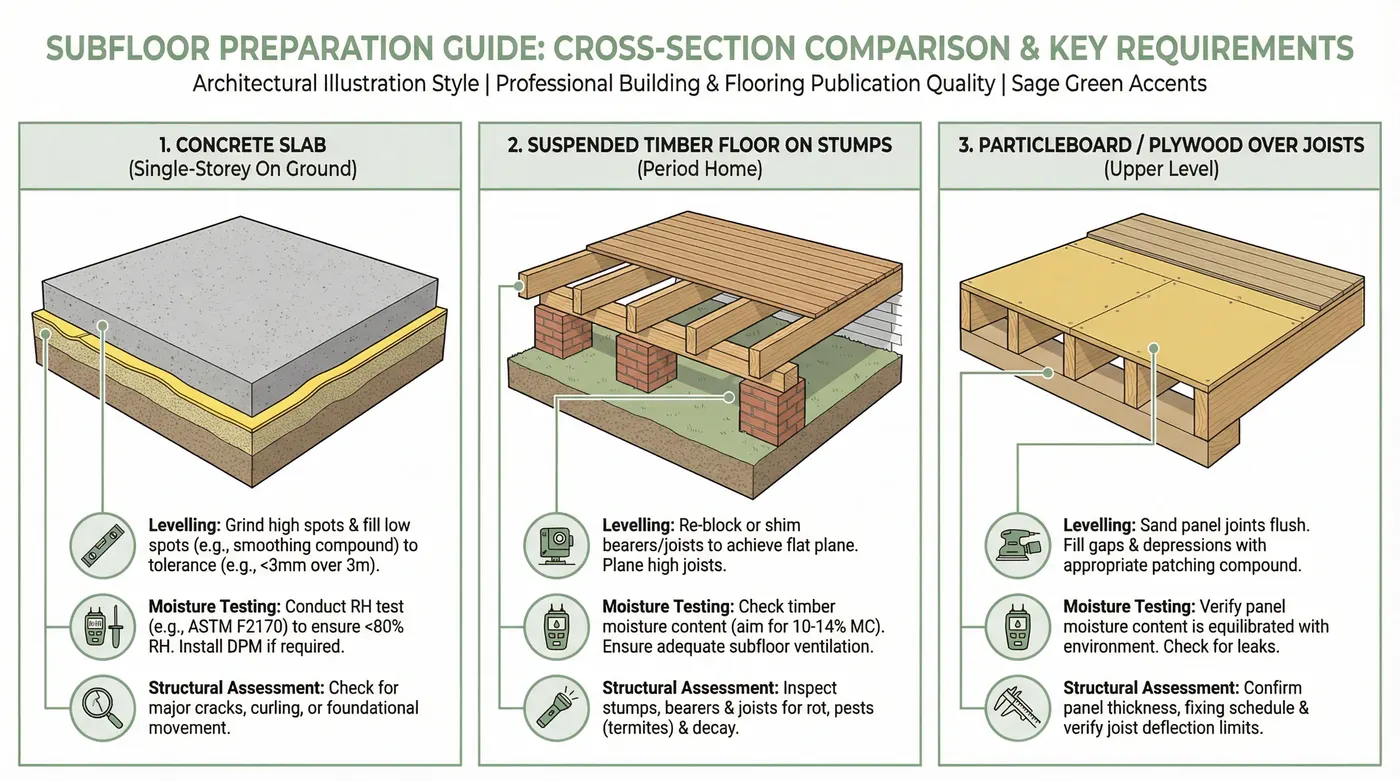
1. Concrete Slab — Ground Floor, On-Ground
The concrete slab is the dominant subfloor type in Melbourne’s residential new-build market and in ground-floor commercial and apartment settings. It presents a specific preparation challenge profile: it is dimensionally stable under load, but it is a persistent moisture source, it is prone to surface laitance (the weak, dusty layer that forms at the slab surface during curing), and it rarely achieves the flatness tolerances required for modern floor coverings without active levelling work.
2. Suspended Timber — Period and Pre-War Construction
Melbourne’s inner and middle suburbs contain a large stock of pre-1960 residential construction built on suspended timber floors — floor joists, bearers, and stumps sitting over a subfloor cavity that ventilates to the outside air. These subfloors present a different preparation challenge: structural deflection, bounce, squeaking, and the risk of elevated moisture vapour transmission from inadequately ventilated subfloor cavities. They do not present the same residual moisture risk as on-ground slabs, but the requirements for mechanical stability are stringent.
3. Particleboard and Plywood — Upper Levels
In contemporary two-storey construction, upper-level floors are typically sheeted with structural particleboard or plywood over steel or timber floor joists. Particleboard is particularly sensitive to moisture — it swells, delaminates, and loses structural integrity when wet, and must be assessed carefully before flooring installation. Both materials can develop movement and squeaking at sheet joints if the structure beneath them is deflecting.
Moisture Testing
Moisture testing is the foundation of every subfloor preparation decision on a concrete slab, and it should be performed with appropriate methodology before any flooring or adhesive product is installed.
AS/NZS 1080.1 and In-Situ Relative Humidity Testing
Australian practice references AS/NZS 1080.1:2012 — Methods of Test for Timber: Moisture Content, the oven-dry gravimetric method, as the definitive reference standard for determining the moisture content of timber subfloor and board materials. For timber products, a moisture content exceeding 12–14% in most cases represents a condition requiring remediation before installation.
Concrete Slab Preparation: The Technical Requirements
Surface Tolerance
The flatness of a concrete slab surface must meet defined tolerances before most modern floor coverings can be installed. The Australian industry standard tolerances are:
These tolerances are not conservative — they reflect the actual operational limits of the floor products above. A floating floor installed over an out-of-tolerance slab will rock over the high point of the deviation, concentrating stress at the click-lock joint profile at that location. Over time and with traffic, this produces joint failure, hollow spots, and the characteristic drumming sound that indicates a board unsupported at its mid-span.
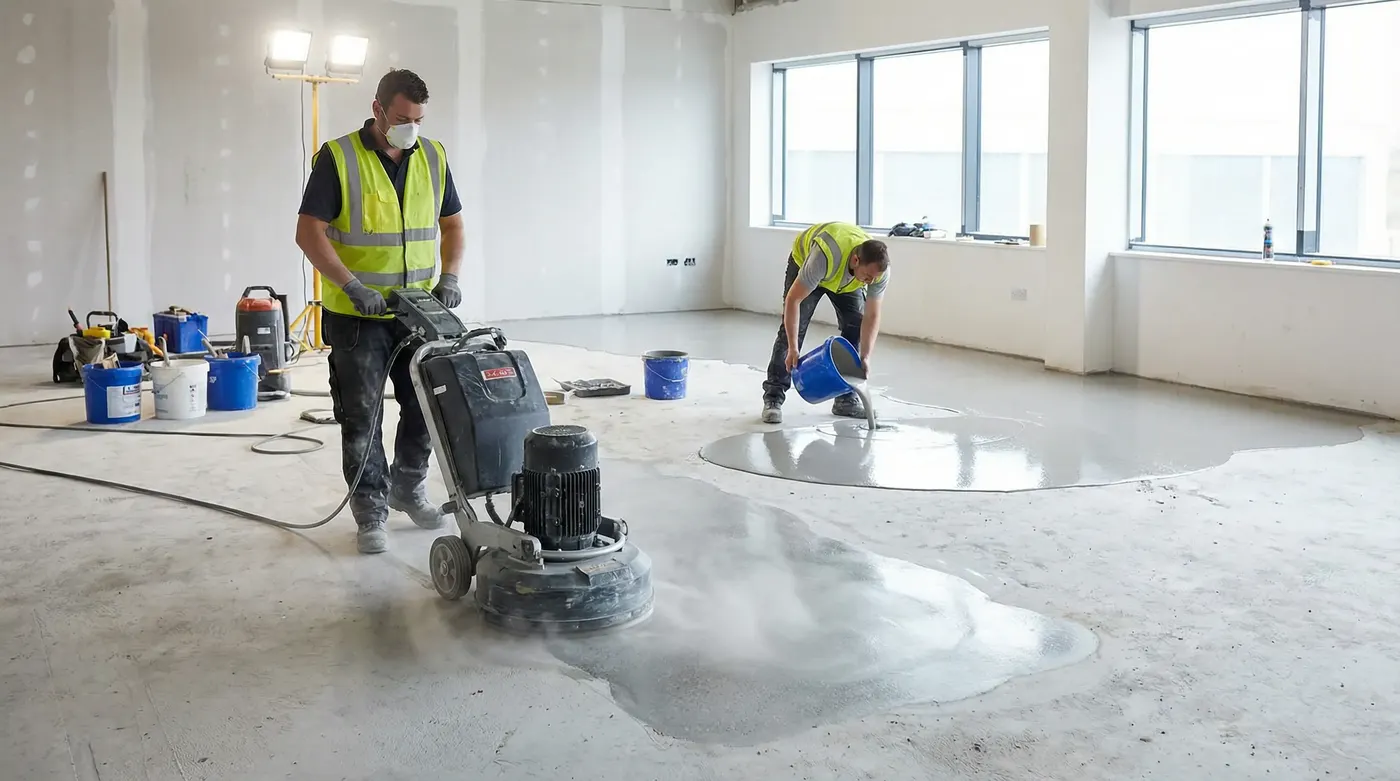
Grinding and Preparation
High spots must be mechanically ground using a diamond-cup grinder or similar abrasive equipment. This is not a task for a belt sander or hand-held angle grinder for large areas — the correct tool is a purpose-built floor grinder that can work efficiently across large floor areas while maintaining consistent material removal.
Self-Levelling Compounds
Low spots and general out-of-tolerance flatness are corrected using self-levelling or self-smoothing cementitious compounds. These pumpable or pour-applied products flow under gravity to establish a level surface, typically to a finished thickness of 3–25mm depending on the product. Key technical requirements:
- Substrate priming is mandatory before self-levelling compound application — unprimed concrete will draw moisture from the compound during curing, causing surface dusting, cracking, and reduced strength
- Minimum compressive strength: Quality self-levelling compounds achieve 20–30 MPa compressive strength — adequate for residential applications; commercial applications with pallet jack or trolley loading require products rated to 40+ MPa
- Curing time: Most self-levelling compounds require 24–48 hours cure before floor installation can proceed; check product technical data sheet for confirmed foot traffic and installation timelines
Moisture Barriers and Damp-Proof Membranes
For on-ground concrete slab installations where moisture testing indicates elevated RH or where the slab has no original damp-proof membrane (DPM) in its construction — common in Melbourne’s older residential stock — a surface-applied DPM is required before timber-based flooring installation.
The standard Australian practice employs a two-component epoxy moisture barrier system:
- Penetrating primer/hardener: Applied to the prepared slab surface, this penetrates the pore structure of the concrete and chemically reacts to reduce the permeance of the surface layer
- Membrane coat: A film-forming layer of epoxy or polyurethane applied over the primed surface, creating a low-permeance barrier that restricts vapour transmission upward into the floor assembly
Performance specification: A quality surface DPM should achieve a water vapour transmission rate that brings effective slab RH performance to below the installation threshold. Always verify that the DPM product and the flooring adhesive are chemically compatible — some epoxy membranes are incompatible with urethane adhesives, and the consequences of adhesive bond failure on an incompatible surface are complete installation failure.
For hybrid floating floor installations where a DPM membrane is specified, a polyethylene sheet moisture barrier (minimum 0.2mm / 200 micron) installed as an underlay layer is often sufficient, provided the tested moisture levels are within the product’s tolerance range. Check manufacturer specifications.
Floating engineered hardwood and water-resistant laminate will be installed over an underlay/moisture barrier usually 2–3mm thick that serves the same purpose.
Suspended Timber Subfloor Preparation
Suspended timber subfloors require assessment and preparation on different terms from concrete. The moisture risk is lower (the subfloor cavity should be ventilating to outside air), but the structural requirements are more demanding.
Checking for Deflection and Bounce
The critical test: walk the entire floor area, noting any areas of spring, bounce, or movement. Measure deflection under load at suspect locations using a straight edge and feeler gauge or dial indicator — maximum acceptable deflection under 1kN (approximately 100kg) point load is 1.5–2mm for most resilient flooring and timber applications.
Excessive deflection is caused by:
- Under-span joists or excessively wide joist spacings for the sheet or board product above
- Notched or damaged joists reducing structural section
- Stump settlement creating uneven bearing
- Deteriorated or delaminated sheeting
Remediation options: Additional blocking between joists to reduce effective span; sister joists bolted alongside damaged members; stump relevelling by a licensed building contractor; sheet replacement where deteriorated. These are structural interventions that should be performed by a licensed builder before flooring installation proceeds.
Squeaking: Cause and Cure
Squeaking in timber subfloors is caused by the movement of timber surfaces against each other — most commonly, floorboards or sheeting moving against joist surfaces, or joist movement against bearer bearing points. The diagnostic test is to systematically apply weight to suspected locations and listen for the squeak’s origin point.
Remediation: Screws driven through sheeting into joists at the squeak location are the most reliable permanent fix — always consider getting a professional to do this, so as to be covered by insurance. For board-on-joist constructions, construction adhesive injected into the gap between board and joist (using a flexible nozzle injector) can stabilise movement where re-nailing or screwing is impractical.
Ventilation of the Subfloor Cavity
A suspended timber subfloor cavity requires adequate cross-ventilation to maintain low moisture levels in the timber floor structure. The Australian standard practice mandates a minimum of one ventilator per 3–4m of wall length, positioned to create through-ventilation across the cavity. Blocked or inadequate subfloor ventilation is a primary cause of elevated timber moisture content, joist deterioration, and the moisture problems that subsequently affect floor coverings above.
Inspect and clear existing ventilators before any flooring installation on a suspended timber subfloor. If ventilation is demonstrably inadequate, engaging a licensed builder to install additional ventilators is appropriate prior to flooring work commencing.
Particleboard and Plywood Assessment
For upper-level floors in contemporary residential construction, structural particleboard (typically 19mm P5-grade moisture-resistant) or plywood (typically 12mm or 19mm structural grade) sheeted over steel or timber floor joists forms the subfloor surface.
Critical check for particleboard: Standard P3-grade particleboard (not moisture-resistant) will swell, delaminate, and structurally degrade if exposed to moisture — during construction or from subsequent water events. Test the sheeting by examining the sheet edges at joints: if swelling, delamination, or edge softness is present, the affected sheets must be replaced before flooring installation. P5 moisture-resistant grade is the minimum specification for floor sheeting.
Joint movement: Particleboard and plywood sheet joints will develop visible ridges that telegraph through resilient floor coverings if the sheets are not fully supported at their edges on joist lines. Tongue-and-groove sheeting profiles address this at installation; where square-edge sheets have been used, ensure all edges are supported and apply a flexible gap-filling compound at joints before laying.
Acclimatisation: Why It Cannot Be Skipped
Where the humidity/moisture levels of where the wood based flooring was stored varies from where it is to be installed, timber-based flooring products must be acclimatised within the installation space before installation. This is not a procedural formality — it is the physical process of allowing the board moisture content to reach equilibrium with the ambient conditions of the space in which it will permanently live.
Equilibrium Moisture Content (EMC): Timber is hygroscopic: it absorbs and releases moisture vapour until its internal moisture content equilibrates with the relative humidity of the surrounding air. If boards are installed before this equilibrium is reached, dimensional movement will occur after installation — creating gaps (if the boards were too wet and subsequently dried) or compression-induced buckling (if the boards were too dry and subsequently absorbed moisture).
Protocol: Engineered floor boards should be stored within the installation space — stacked with spacers to allow air circulation on all surfaces — for a minimum of 48 hours prior to installation.
Subfloor preparation is unglamorous work. It involves grinding, testing, waiting, and occasionally delivering news that an installation needs to be delayed. It generates no beautiful images for Instagram. But it is the most professionally important stage of any flooring installation, and the quality of every floor that goes above it rests entirely on how thoroughly it is performed.
A floor installed over a properly prepared subfloor will perform precisely as specified for its full intended service life. A floor installed over an inadequately prepared subfloor may look perfect at handover and will, with the reliability of physics, fail somewhere in the first two to five years of use. The investment in preparation is not optional — it is the price of a lasting result.
Published by The Flooring Centre — Melbourne's premium carpet and flooring superstores. Visit our Nunawading and Hawthorn showrooms.